How to Set Up Domain & Mailbox for Cold Email?
Efficiently setting up a domain and mailbox for cold email campaigns is a strategic process that demands meticulous attention to detail.
So, how do we set up domains and mailboxes to run cold email campaigns?
It all begins with the domain. A domain name is a distinct, memorable identifier used to navigate to websites like google.com or forbes.com.
From establishing your email-sending capacity to ensuring authentication protocols, each step is essential to the success of your outreach efforts.
Consider domain reputation, compliance, and deliverability nuances to navigate the complexities of cold email setup effectively.
Stay tuned to unravel the intricacies of building a robust foundation for your cold email strategy.
Why Do You Need Burner Domains for Cold Email Campaigns?
Dedicated domains are necessary for cold email campaigns because they are pivotal in safeguarding primary business communications and nurturing a reputable sender identity.
Utilizing separate burner domains for cold outreach protects your business domain reputation inbox from spam traps.
Moreover, dedicated secondary domains allow you to scale quickly for cold outreach.
Step #1: Determine Your Sending Capacity
Determining the ideal sending capacity is an essential initial step in planning your cold email campaign strategy. Before setting up your domain, you must calculate your daily volumes and email-sending capabilities.
For instance, if you aim to send 1,000 emails daily, you will need multiple domains and email addresses to achieve this goal efficiently.
By purchasing ten domains and setting up three email inboxes per domain, you can increase your sending capacity to 900 emails daily (10*3*30).
Each email address can send around 30 emails daily, allowing for practical warmup tools to avoid spam complaints.
Step #2: Diversify Everything
Now that you know your sending capacity, you should be able to figure out exactly how many domains and email inboxes you need.
When we say diversify everything, we mean EVERYTHING.
- Don't buy all the domains from one provider
- Don't buy all the email inboxes from one email hosting provider
- Don't create all your email inboxes under one Google Workspace Admin
We used to praise Porkbun for buying domains for cold email. However, porkbun domains are suffering from deliverability issues. Check this post below ⬇️⬇️⬇️
We used to think Outlook was one of the safest email providers, but they’re slowly cracking down on cold emailers like Zoho. So, should you jump ship? Not exactly. You just need to be a bit more careful while warming up.

We recommend spreading your email inboxes evenly among these four providers.
- Google Workspace
- Outlook
- Mailforge.ai
- Infraforge.ai
So, if you have 20 domains and want to deploy 20 * 3 = 60 email inboxes, divide and conquer by deploying five domains of these four providers.
Also, when using Google Workspaces, use one Admin workspace to deploy one domain with three email inboxes. That’s the safest play right now, in 2024.
Step #3: Buy Dedicated Secondary Domains
When purchasing dedicated secondary domains, consider selecting brand-aligned domain names to enhance email outreach effectiveness. Aligning domain names with your company's domain and brand identity is essential for building trust with recipients.
For best results in your cold email outreach strategy, adhering to best practices in domain registration is essential. When setting up your domain for cold outreach, consider the following methods:
- Choose the Right TLD: Choose a domain extension, aka Top-Level Domain, that aligns with your brand reputation and identity, such as .com, .net, or .io.
- Utilize Similar Domains: Registering a similar domain can aid in brand association and organization of emails, enhancing the credibility of your personalized emails.
Pro Tip: Get older domains. Check the domain age; older domains tend to stand better with spam filters.
Step #5: Point Domains to Your Email Hosting Server
After securing your dedicated secondary domains aligned with your brand identity, the next step is to direct these domains to your email hosting server.
To integrate the domains with your email service provider, you must set up Verification and MX records in your domain registrar's DNS editor settings.

Proper MX record configuration helps maintain high email deliverability, safeguard the sender reputation, and ensure emails reach their intended recipients. Once you finish the setup, redirect all your secondary domains to the primary domain.
- Domain Verification
- Set up MX Records
- Change Nameservers in the case of Mailforge.Ai
- Redirect Domains to Primary Business Domain
If you choose Mailforge as your email service provider, you can create email inboxes by changing nameservers.
Step #6: Set up SPF, DKIM & DKIM records
This section focuses on Google Workspace, mainly because it's the most popular email provider.
Setting up SPF, DKIM, and DMARC records is essential for cold emailing prospects, guaranteeing your domain's authenticity and credibility.
SPF (Sender Policy Framework) validates emails from authorized IP addresses, while DKIM (DomainKeys Identified Mail) adds digital signatures to prevent spoofing.
DMARC combines SPF and DKIM to fortify email security against spoofing and phishing attempts.
1. Setting up SPF

Implementing SPF for your Google Workspace (Sender Policy Framework) is essential in setting up email authentication for domain reputation and email deliverability. To set up SPF effectively, follow these steps:
- Open the DNS editor for your domain.
- Add a TXT record with a 3600 TTL with the following content: v=spf1 include:_spf.google.com ~all.
- Repeat this process for all relevant domains associated with your email delivery infrastructure.
2. Setting up DKIM

Configuring DKIM is the next step in bolstering your email security and deliverability.
DKIM (DomainKeys Identified Mail) prevents email spoofing by attaching a digital signature to each email.
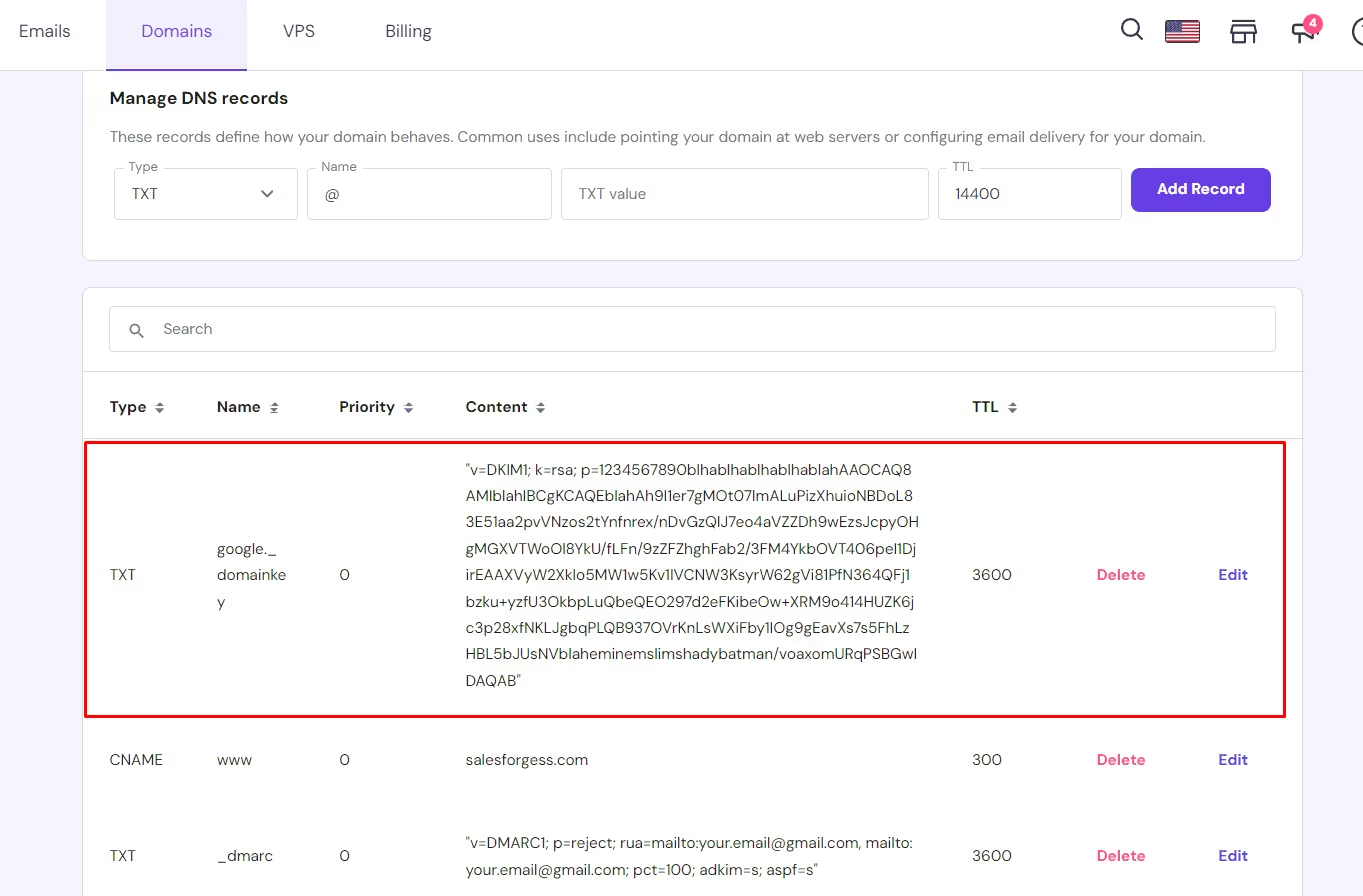
To set up DKIM, you can obtain your DKIM key from Google Workspace
- Visit Admin Console
- Accessing Apps > Google Workspace > Settings for Gmail > Authenticate Email and generating a new record.
- Get the key, open your domain's DNS Records editor
- Add it as a TXT record with a Time To Live (TTL) of 3600.
Implementing DKIM authentication enhances your email security, prevents email spoofing, and improves email deliverability.
3. Setting up DMARC

Implementing DMARC helps safeguard your domain and emails from malicious activities. It enhances email security and protects against spoofing and phishing attacks.
Here's how you can set up DMARC effectively:
- Access your DNS Editors to add a DMARC record.
- Create a new TXT record with the name _dmarc.
- Insert the TXT value with specific parameters like 'v=DMARC1; p=reject; rua=mailto:youremail@johndoe.com, mailto:youremail@johndoe.com.com; pct=100; adkim=s; aspf=s' and a TTL of 3600.

We know setting up your Google Workspace can be a huge pain. We built Mailforge to avoid spending time on pointless technical stuff and focus more on generating sales.
Step #7: Warm up your new domain and email address
Gradually warming up your new domain and email address is key here.
Your email warm-up process is essential to establish a positive reputation with spam filters and ensure successful campaigns.
Start by sending a few emails daily to responsive contacts for about three months, gradually increasing the email sending capacity during the warm-up period. This needs to be done for each mailbox.
If you use Mailforge, then you'd never have to worry about getting blacklisted. They offer email servers that use a pool of IPs to prevent spam, a technology similar to Google Workspace emails.

Salesforge has a built-in email warm-up system, so you don't have to worry about paying extra for tools like Lemwarm or warm-up inbox.
Compliance With Email Regulations
Moving from setting up your domain and email address to guaranteeing compliance with email regulations is critical in maintaining the integrity and legality of your cold email campaigns.
To ensure you respect email regulations and avoid email deliverability issues, consider the following:
- Validate your emails to improve deliverability and avoid spam filters.
- Implement DKIM & DMARC protocols to authenticate your emails.
- Monitor your spam score regularly to prevent your emails from being marked as spam.
How to Get Started ASAP With Mailforge?
Assuming you want a sending capacity of 10,000 emails a month.
So you’d need 12 domains. 12*3 = 36 mailboxes. And 36*30 = 1080 emails sent to new prospects a day. With five emails per sequence, you’ll send 5400 emails per cold email campaign. And you can easily schedule two campaigns per month, which equates to a little over 10,000 (5400*2 = 10,800)
- Open up the mailforge.ai dashboard.
- Use our Domain Calculator to determine your sending capacity
- Go to Domains ➡️ Press Auto Generate Domains ➡️ Buy 12 domains
- Deploy Emails
- Oh, there’s no step five. We just added it cause it looks fantastic. Mailforge is just that fast.
To Wrap It All Up
Establishing a domain and mailbox for cold email campaigns requires careful planning and attention to detail.
Following the steps outlined in this article, such as determining sending capacity, purchasing dedicated domains, setting up authentication records, and complying with regulations, can guarantee a successful cold email setup.
While Google Workspace makes everything complex, MailForge exists to relieve agency owners of the burden.
FAQs
Should I Send Cold Emails from the Primary Business Domain?
Sending cold emails from the primary domain may decrease deliverability due to the risk of being marked as spam. You'd also lose the ability to do essential business communications.
Why You Should Use Separate Domains for Cold Email Outreach?
By segregating your cold email activities to a distinct domain, you can prevent any negative impact on your main domain's sender score and credibility.
This separation helps isolate potential issues that may arise from cold emailing, safeguarding the reputation of your primary business domain.


